Posts

WEEK 10 - 21st April 2020
Image
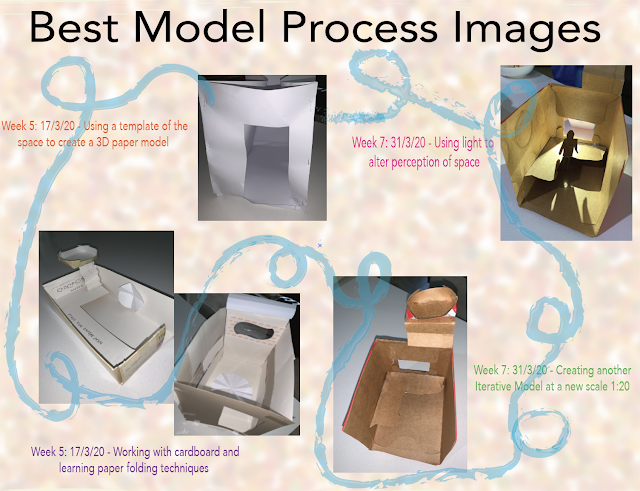
ENTRY 9: WEEK 10 - 21st April 2020 Final curated blog  submission documenting best 10 technological and model process images from week 5 onwards: ASSESSMENT 3 DELIVERABLES 100 Word Statement Lighting Influences the Perception of Space Lighting within design attributes to the way individuals perceive spaces they occupy.  Light is used to position figures within space. Architect, Etianne-Louis BoullĂ© states,  “the art of touching with the effects of light belongs to architecture” [1]. A warm light was used in the model to portray the inviting atmosphere of the room.   Additionally, the room is intended as a functional workspace, thus the figure being the main focal point, solely to humanise the overall environment. The lighting predominantly shines upon the figure which reinstates the realistic objective of the space. The use of light in the model influenced a perception of space.   [1] Inverse Architecture n.d,...

WEEK 9 - 14th April 2020

Image
ENTRY 8: WEEK 9 - 14th April 2020 The statement   will introduce the title of your project, the intent of your communication approach, and then explain how you accomplished your objectives using an example of one of your projects. Use the “Expository Writing” format: Lighting Influences the Perception of Space Lighting within design attributes to the way individuals perceive spaces they occupy. Light is used to position figures within space. Architect, Etianne-Louis BoullĂ© states, “the art of touching with the effects of light belongs to architecture” [1]. A warm light was used in the model to portray the inviting atmosphere of the room.   Additionally, the room is intended as a functional workspace, thus the figure being the main focal point, solely to humanise the overall environment. The lighting predominantly shines upon the figure which reinstates the realistic objective of the space. The use of light in the model influenced the pe...

WEEK 8 - 7th April 2020

Image
ENTRY 7: WEEK 8 - 7th April 2020 Studio Activities: This week’s  studio activities focus on the visual representation of materials in drawings and in 3D models.  Deliverables:  3 x photoshopped photos of one of your models, (each with different material  combinations) composited into any virtual environment of your choosing. I chose to photoshop the replica model I made in resemblance to the 3D transition space created in Fusion 360 as it had flat surfaces and would be easier to manipulate and edit in Photoshop. I made the background transparent on the image of the model so I would be able to edit it within the new natural environment I was going to place it in.  Below is the photoshopped image incorporating all three material properties and placed within a virtual environment.  I chose a greenspace background as green spaces always remind me of the connection to the natural world. Additionally, the trees in the i...

WEEK 7 - 31st March 2020

Image
ENTRY 6: WEEK 7 - 31st March 2020 Studio Activities: Model 1:  Iterative Model with an additional source of natural light at a new scale  I chose a new scale working at (1:20), the reason being it was more conventional to design at. I chose to use only cardboard for this model, as paper is not as sturdy. Personally, I find it better to work with cardboard as it is more durable and conveys dimension and aspect better than paper.  The body (walls) were simple to cut as they were all rectangular shapes. Additionally, I added the wrap-around desk bench.  The V pleat technique was used to create the stairs to the fort above the window. Then the object at the top of the stairs is a seat. The seat was made first by cutting a rectangular shape, then cutting in the edges and joining to create an elevated oval seat.  The window was left open, as it is the only source of light that enters the space.  These images below are captured in normal room ...

WEEK 5 - 17th March 2020

Image
ENTRY 5: WEEK 5 - 17th March 2020 Model Making Activities: Studio Activities  1) Measure the space’s heights and widths and identify the floor ceilings, walls, doors, and windows. Make a template on flat paper, leaving a tab on the edges and then fold them together to make an enclosed form. In the above images, I realised I had not created the model at the right scale. Therefore, the images below are the model created at the correct scale (1:10) using paper. 2 ) Once you have made this in paper material, make the shape in cardboard  Compare what it is like to work with the two different materials. Which is easier to work with: Both materials present different capabilities. Paper is easier to communicate direct measurements, although the cardboard is better in expressing 3D elements and aspects. Personally, the cardboard is an easier material to work with because I'm able to grasp the dimension and area of the space I'm designing bet...